

What if peeling on your new garage floor isn’t a problem with the epoxy itself? Problems with DIY garage floor epoxy kits often start beneath the coating, where poor surface preparation or moisture can weaken the bond. Bubbling, flaking, and uneven wear are frustrating, especially when a repair could mean more work and wasted materials.
If your coating is failing, it’s reasonable to wonder whether the concrete or the application caused it, and whether you can repair the damage without starting over. The answer depends on how much of the floor is affected and whether the coating is still firmly attached. A small, isolated defect calls for a different response than widespread peeling or recurring bubbles. In Davie and across South Florida, moisture is worth considering, but it is only one possible cause.
This guide explains common failure symptoms, likely causes, and when a limited repair may be realistic. You’ll also learn what to inspect before deciding whether the floor needs broader preparation or a new coating. Careful surface preparation and application matter in a professionally installed epoxy or polyaspartic system, so base your next step on the condition of the concrete, not guesswork.
Key Takeaways
- Use peeling, bubbles, flakes, and uneven wear as clues, not as a diagnosis. The same symptom can have different causes.
- Learn how surface preparation, moisture, and cure conditions can contribute to problems with DIY garage floor epoxy kits.
- Compare a small touch-up, a broader recoat, and a professional assessment based on the affected area and uncertainty about the cause.
- Inspect the floor methodically and follow the kit manufacturer’s requirements before choosing a repair.
- Professional surface preparation and coating application can help shape a practical plan for a failing floor.
Problems with DIY Garage Floor Epoxy Kits: What the Symptoms Can Tell You
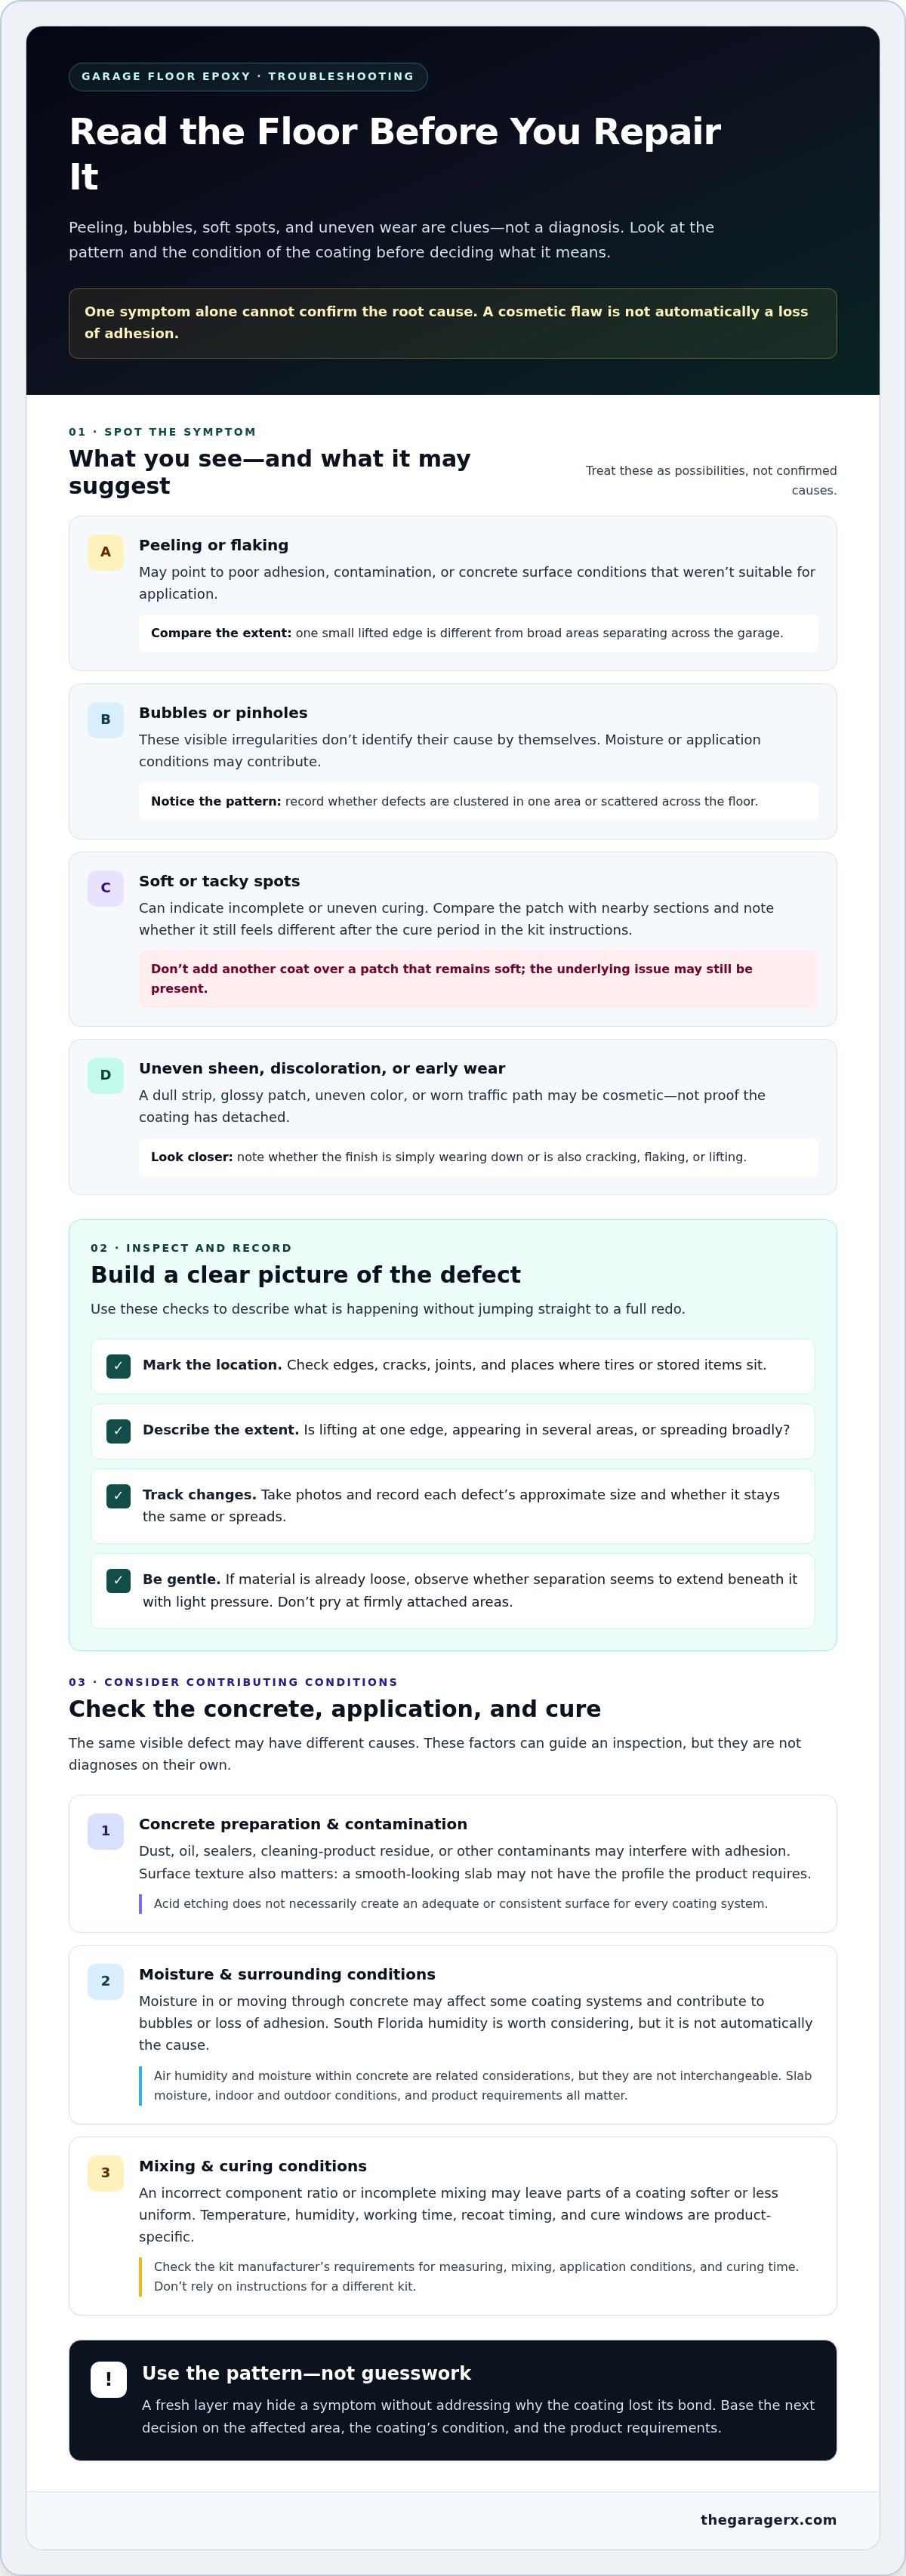
Visible defects can have different causes, so a flawed finish doesn’t automatically mean the entire floor has failed. Here, “failure” means a coating defect or loss of adhesion, not one specific diagnosis. Peeling, bubbling, pinholes, uneven sheen, soft spots, and early wear each offer clues about the coating and the concrete beneath it.
One symptom alone cannot confirm the root cause. Look at where it appears, whether it changes, and what’s happening around it. Record what you see before deciding whether the issue is mostly cosmetic or may involve the coating’s bond.
Why is my garage floor epoxy peeling or flaking?
Peeling can point to poor adhesion, contamination on the concrete, or surface conditions that weren’t suitable for application. Adhesion failure occurs when the coating loses its bond with the prepared concrete. A small lifted edge in one spot is different from broad areas separating across the garage.
Note where the peeling starts. Check edges, cracks, joints, and places where tires or stored items sit. Is the coating lifting at one edge, or are flakes appearing in several areas? If material is already loose, observe whether the separation seems to extend beneath the surrounding coating with light pressure. Don’t pry at firmly attached areas to test them. Take photos and note whether the defect stays the same or spreads.
What do bubbles, soft patches, and uneven color suggest?
Bubbles and pinholes are visible irregularities, but their appearance alone doesn’t identify the cause. Moisture or application conditions may contribute. Note whether the defects are clustered in one area or scattered across the floor, rather than assuming every small opening has the same explanation.
Soft or tacky spots can indicate incomplete or uneven curing. Compare the affected area with nearby sections and record whether it still feels different after the cure period stated in the kit instructions. Don’t add another coat over a patch that remains soft. The underlying issue may still be present.
Discoloration and uneven sheen may be cosmetic, not proof of structural failure. A dull strip, glossy patch, or uneven color can affect the appearance without showing that the coating has detached. Early wear in a traffic path is another clue to document. Consider whether the finish is simply wearing down or whether it is also cracking, flaking, or lifting.
These distinctions make problems with DIY garage floor epoxy kits easier to assess without jumping straight to a full redo. Record each defect’s location, approximate size, and change over time. The pattern can help you distinguish a localized appearance issue from a more widespread concern about adhesion.
What Causes DIY Garage Floor Epoxy Kit Problems?
A peeling edge or soft patch can point to a problem with the concrete, the application, or both. These are possibilities, not diagnoses you can make from a photo. The same visible defect may have different causes, so consider how the slab was prepared and how the kit was mixed and applied.
Coating performance depends on suitable substrate preparation and application conditions that match the product instructions. If the coating has lost its bond, a fresh layer on top may hide the symptom without addressing its cause.
How concrete preparation and contamination affect adhesion
Epoxy needs a suitable surface to bond to. Dust left after cleaning can form a barrier between the concrete and coating. Oil, sealers, cleaning-product residue, and other contaminants may also interfere with adhesion, even if the slab looks tidy. A garage floor can appear clean while still needing mechanical preparation suited to the coating system.
Preparation involves more than removing visible dirt. The concrete’s surface texture affects how well a coating can grip, and a smooth-looking slab may not have the profile the product requires. Acid etching, for example, doesn’t necessarily create an adequate or consistent surface for every system. Professional floor coating work includes surface preparation as well as material application. The Garage RX provides professional floor coating work for homeowners considering a professionally prepared and installed system.
How moisture, mixing, and curing conditions contribute
Moisture in or moving through concrete can affect some coating systems and may contribute to bubbles or loss of adhesion. That doesn’t make South Florida humidity the automatic culprit. The slab’s moisture, indoor and outdoor conditions, and the coating’s requirements all matter. Humidity in the air and moisture within concrete are related considerations, but they aren’t interchangeable. One observation alone can’t establish the source of a defect.
Mixing errors are another possible explanation for inconsistent curing. If a kit has separate components, an incorrect ratio or incomplete mixing can leave parts of the coating softer or less uniform than others. Follow the product’s directions for measuring, mixing, working time, and recoat timing rather than relying on instructions for a different kit.
Temperature, humidity, and cure windows are product-specific. A garage that feels comfortable may still fall outside the kit’s stated application conditions. Check the manufacturer’s requirements for application conditions and curing time, and note the weather and garage environment during the work. Don’t assume one condition explains every instance of problems with DIY garage floor epoxy kits. Comparing the floor’s defects with your preparation and application history gives you a clearer basis for the next inspection.
Repair, Recoat, or Start Over? Compare Your Epoxy Floor Options
The right fix depends on how much of the floor is affected and whether the coating is still firmly attached. A new layer can’t make a weak bond dependable. If loose material remains or the original cause hasn’t been addressed, another coat may fail along with it.
Think about the extent of the damage, not just its appearance. A small, stable blemish may be manageable as a localized repair. Defects in several areas call for a closer look at the existing coating and concrete before you commit to recoating.
| Option | Defect coverage | Likely preparation needs | Disruption | Uncertainty |
|---|---|---|---|---|
| Limited touch-up | Small, stable, isolated cosmetic defect | Prepare the area as directed; confirm compatibility with the existing coating | Usually limited to the affected spot | Higher if the coating’s cause or compatibility is unclear |
| Broader recoat | Widespread wear or multiple affected areas | Assess and prepare the existing surface; address loose coating and the underlying cause | May involve much of the garage floor | Depends on the existing coating’s condition and bond |
| Professional assessment | Recurring or extensive defects, or unclear cause | Evaluate the coating and concrete to define appropriate preparation | Depends on the repair or installation scope | Helps clarify the condition before choosing a coating plan |
When might a small DIY epoxy repair be reasonable?
A localized repair may be worth considering if the defect is small, stable, and cosmetic, with no sign of dampness, softness, or active peeling nearby. First identify the coating already on the floor and whether the repair material is compatible. Follow the repair product’s instructions for surface preparation, application, and cure conditions.
Don’t cover loose, damp, soft, or actively peeling material. A patch can hide the symptom without restoring the bond or resolving the condition underneath. If the problem is spreading, pause and reassess instead of extending the repair across the floor.
When does widespread failure call for a professional assessment?
Recurring peeling, extensive bubbling, broad soft areas, or several failed patches are good reasons to have the floor assessed before recoating. Widespread failure calls for a closer look at the concrete before another coating is selected. The right scope depends on the coating’s adhesion, the concrete’s condition, and what material is already on the floor.
A professional assessment can help distinguish a limited repair from a broader preparation and coating project. The professional epoxy floor coating guide explains why preparation is part of the installation plan. If you’re weighing problems with DIY garage floor epoxy kits, choose a next step that responds to the floor’s condition rather than simply adding another layer.
How to Troubleshoot DIY Epoxy Kit Problems in a South Florida Garage
Pause before attempting a repair. A methodical inspection can help you spot patterns, preserve useful information, and avoid covering a defect before you understand it. In Davie and elsewhere in South Florida, humidity and changing weather are relevant context, but neither proves what caused a particular coating problem. Let the kit’s requirements and the floor’s condition guide your assessment.
What should you inspect before attempting a repair?
Work through these checks in order. Keep the kit instructions and product labels nearby. Don’t aggressively scrape the floor or apply more coating during the inspection.
- Map the defects. Sketch the garage floor or mark up a photo. Record where peeling, bubbles, pinholes, wear, or color changes appear. Compare their locations with vehicle parking areas, slab edges, visible cracks, and places where water may enter or collect.
- Describe what you see. Note whether each area is loose, tacky, visibly wet, or simply discolored. Don’t pry up firmly attached coating to test it. A change in texture or a clear edge lifting from the concrete is useful to record without enlarging the damaged area.
- Photograph the pattern. Take clear, well-lit photos from close up and farther back, so both individual defects and their location in the garage are visible. Add dates and note when you first noticed each issue. This record can show whether a defect is stable or spreading.
- Reconstruct the application conditions. Write down when the floor was coated, when defects appeared, and what you remember about the garage and weather. Review the kit’s instructions for product-specific temperature, humidity, application, and cure requirements. Keep the instructions with your notes.
- Look for related conditions. Check whether affected areas line up with cracks, slab edges, damp-looking spots, or tire paths. These are clues, not proof of a cause. Avoid aggressive scraping or recoating until you understand whether the coating is attached and whether moisture or another underlying condition may be involved.
How can South Florida conditions complicate epoxy-kit application?
Warm, humid weather and changing conditions can matter during application and curing, but their effect depends on the coating. Temperature and humidity limits, recoat windows, and cure times vary by product. Check the manufacturer’s instructions rather than applying a general rule or assuming local humidity caused the defect.
Consider whether rain or moisture could have reached the slab or garage during preparation, application, or curing. That is part of the timeline to investigate, not a diagnosis. Record what happened and compare it with the kit’s requirements. For related local climate and coating context, see this South Florida polyaspartic coating durability guide.
For recurring or widespread problems with DIY garage floor epoxy kits, an organized record can help clarify the next step. Explore professional garage floor coating options if you’re considering a professionally prepared epoxy or polyaspartic system.
A Professional Path Forward for Failed Garage Floor Epoxy
Recurring or widespread coating defects can make the next step feel like guesswork. A professional assessment can help turn visible symptoms into a clearer project scope. Rather than treating every bubble, flake, or worn patch as the same problem, consider the floor’s overall condition and whether the work involves a localized area, broader preparation, or a new coating system.
The extent of the defects, the condition of the existing coating, and the state of the concrete all matter. The coating already on the floor also affects the preparation and application approach. That’s why a quick cover-up isn’t always the practical answer to problems with DIY garage floor epoxy kits.
What does a professional garage floor coating project address?
The existing floor condition informs the scope and coating approach. Professional installation includes surface preparation and material application, with the work planned around the concrete and existing coating, not just the visible finish. If the original coating is loose or the slab needs broader preparation, the project may require more than applying a new layer. Not every failed DIY floor can be repaired without addressing underlying conditions.
The Garage RX installs professional epoxy and polyaspartic floor coatings. The project plan accounts for the floor’s condition and the preparation needed before material is applied. This puts the focus on the surface and the coating system, rather than simply covering visible defects.
When should Davie and South Florida homeowners get expert help?
Consider professional help if peeling keeps returning, defects cover large areas, bubbling is widespread, or multiple limited repairs have failed. These patterns can make it difficult to know whether a touch-up is suitable or whether the coating and concrete need more extensive attention. Recoating without understanding the condition underneath may repeat the same cycle of disruption.
Bring your observations: photos, when defects appeared, where they occur, and the kit instructions or product details if available. This information can help explain the floor’s history, while the visible condition helps shape the next steps. The goal is to define the work involved, not assume every garage needs the same preparation or coating.
The Garage RX serves homeowners in Davie and across Broward, Miami-Dade, and Palm Beach counties with professional epoxy and polyaspartic coating installation, including surface preparation and material application. If you’re weighing the next step for a failing floor, explore garage floor coating solutions.
Choose a Clear Next Step for Your Garage
A failed coating can make the whole garage feel like an unfinished project. Before buying another kit or committing to a full redo, consider how you use the space, what finish would suit it, and how much disruption you’re willing to take on. Those priorities can help shape a plan that feels practical rather than reactive.
Problems with DIY garage floor epoxy kits don’t have to leave you stuck between ignoring the damage and starting over blindly. A careful look at the coating and concrete can help you make a better-informed decision about the floor and the work ahead.
For a professionally planned coating project in Davie, explore your garage floor coating options with The Garage RX.
Frequently Asked Questions
Why is my DIY garage floor epoxy peeling up?
Peeling can result from poor adhesion, contamination, inadequate preparation, or application conditions that didn’t suit the product, but the symptom alone can’t confirm the cause. In Davie, document whether lifting begins near an edge, crack, or tire path and whether it spreads over time. Don’t coat over loose material. Before choosing a compatible repair, establish how much coating is affected and whether the surrounding layer remains firmly attached.
Can you put another coat of epoxy over a failed DIY garage floor?
Sometimes, but only if the existing coating is stable and compatible with the new product. Loose, soft, or poorly bonded areas need attention first, or the new layer may separate with the old one. Check the manufacturer’s instructions for compatibility and preparation requirements, including whether the existing coating can be recoated. If defects extend across several parts of the floor, a professional assessment can help clarify whether the scope goes beyond another coat.
Can humidity make a garage floor epoxy kit fail?
Humidity and moisture can affect some epoxy products, but the allowable conditions depend on the specific kit and application. In South Florida, compare the conditions on application day with the product label. Humidity alone doesn’t prove what caused a defect. Review the manufacturer’s stated temperature, moisture, and curing requirements, and consider whether rain or damp conditions may have affected the slab or garage during the work.
What causes bubbles in a DIY epoxy garage floor?
Bubbles or pinholes can have several possible causes, including application conditions, trapped air, or moisture-related issues. Their appearance alone can’t diagnose the concrete. Note whether defects appeared during application or after it cured, and mark where they occur. Check whether nearby areas feel soft or show signs of lifting. Before adding another layer, identify and address the likely cause so you don’t conceal a problem that could continue underneath.
How do you fix hot tire pickup on a DIY epoxy floor?
Hot tire pickup is coating that lifts or marks where warm tires contact the floor. It may relate to adhesion, surface preparation, or product performance, but the mark alone doesn’t reveal the cause. Note whether damage follows tire contact areas and whether coating comes away with the mark. Don’t simply cover it. First assess whether the surrounding coating is stable, then follow the repair product’s compatibility and preparation instructions.
How much does it cost to fix a failed DIY epoxy garage floor?
The cost depends on how much of the floor is affected, the condition of the coating and concrete, and the preparation the project requires. A small isolated defect and widespread separation are different scopes, so one repair approach or price won’t fit every garage. For recurring or extensive failure, an assessment can help define the work involved. Davie homeowners can use that project scope to make an informed decision rather than relying on a guess based on photos alone.
How long should you wait before parking on a DIY epoxy garage floor?
Follow the kit manufacturer’s stated cure and return-to-service instructions. Timing varies with the product and site conditions. Some labels distinguish light foot traffic from vehicle traffic, so don’t treat those milestones as interchangeable. If the garage temperature or humidity differed from the product’s stated requirements during application, follow the manufacturer’s guidance for that situation rather than a generic timeline. Parking too early may mark or damage a coating that hasn’t cured sufficiently.